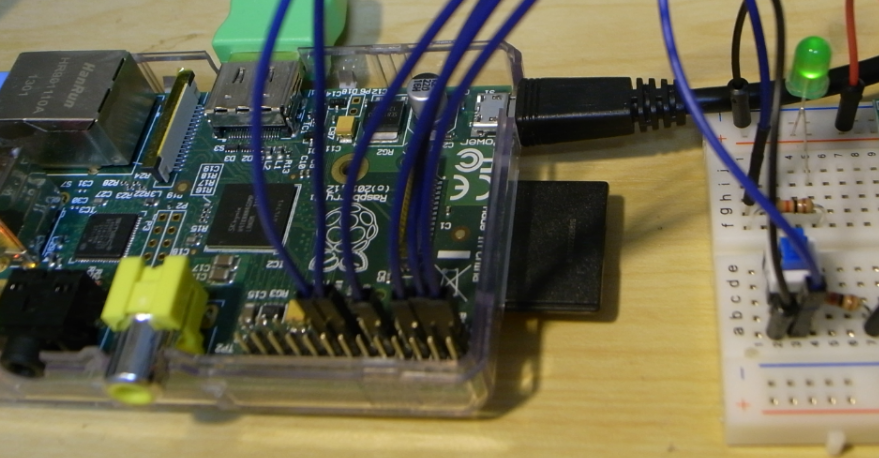
Ruby C拡張を使ったRaspberry pi gpio 制御
RubyでRaspberry piのgpio制御したかったので、pi_pier gem のインストールに挑戦したがうまくいかなかったので以下の情報を参考にRuby C拡張ライブラリを作ってみた。
C言語によるgpioの制御
Ruby C拡張ライブラリ
Blog Alpha Networking: RubyによるC拡張ライブラリの作成方法
動作環境
Raspberry pi1 Model B
Raspbian GNU/Linux 8.0 (jessie)
ruby 2.1.5p273 (2014-11-13) [arm-linux-gnueabihf]
1.C言語プログラム
rasp_gpio.c
// rasp_gpio: Raspberry Pi GPIO Ruby module
#include <ruby.h>
#ifndef __RASP_GPIO__
#define __RASP_GPIO__
#include <stdio.h>
#include <stdlib.h>
#include <fcntl.h>
#include <sys/mman.h>
#include <unistd.h>
// ピン機能(BCM2835)
#define GPIO_INPUT 0x0 // 入力
#define GPIO_OUTPUT 0x1 // 出力
#define GPIO_ALT0 0x4
#define GPIO_ALT1 0x5
#define GPIO_ALT2 0x6
#define GPIO_ALT3 0x7
#define GPIO_ALT4 0x3
#define GPIO_ALT5 0x2
// レジスタブロックの物理アドレス
#define PERI_BASE 0x20000000
#define GPIO_BASE (PERI_BASE + 0x200000)
#define BLOCK_SIZE 4096
#endif
// 関数の宣言
static VALUE gpio_alloc(VALUE klass);
static VALUE gpio_init(VALUE self);
static VALUE gpio_conf(VALUE self, VALUE i_pin, VALUE i_mode);
static VALUE gpio_set(VALUE self, VALUE i_pin);
static VALUE gpio_clear(VALUE self, VALUE i_pin);
static VALUE gpio_read(VALUE self, VALUE i_pin);
void Init_rasp_gpio(void)
{
VALUE RaspGpio;
// クラスを定義
RaspGpio = rb_define_class( "RaspGpio", rb_cObject ); // class cGpio < rb_cObject
//フィールドのクラスへの関連付け
rb_define_alloc_func(RaspGpio, gpio_alloc);
// メソッドクラスへの関連付け
rb_define_private_method( RaspGpio, "initialize", gpio_init, 0);
rb_define_method( RaspGpio, "conf", gpio_conf, 2);
rb_define_method( RaspGpio, "set", gpio_set, 1);
rb_define_method( RaspGpio, "clear", gpio_clear, 1);
rb_define_method( RaspGpio, "read", gpio_read, 1);
}
//フィールドの定義
struct raspgpio {
volatile unsigned int *Gpio; // GPIO 関連レジスタ (volatile=必ず実メモリにアクセス させる)
};
//フィールドをクラスへセット
static VALUE gpio_alloc(VALUE klass)
{
struct raspgpio *ptr = ALLOC(struct raspgpio);
// klass へフィールドをセットする
return Data_Wrap_Struct(klass, 0, -1, ptr);
}
// GPIO 初期化
// initialize メソッドをクラスへセット
VALUE gpio_init(VALUE self)
{
struct raspgpio *ptr;
// self("struct RData *" である VALUE)から "struct RaspGpio *" を取り出す
Data_Get_Struct( self, struct raspgpio, ptr );
int fd;
void *gpio_map;
// /dev/mem(物理メモリデバイス)を開く(sudo が必要)
fd = open("/dev/mem", O_RDWR | O_SYNC);
if (fd == -1) { return T_FALSE; }
// mmap で GPIO(物理メモリ)を gpio_map(仮想メモリ)に対応づける
gpio_map = mmap(NULL, BLOCK_SIZE,
PROT_READ | PROT_WRITE, MAP_SHARED,
fd, GPIO_BASE );
if (gpio_map == MAP_FAILED) { return T_FALSE; } // MAP_FAILED => (void *)-1)
// mmap 後は不要な fd をクローズ
close(fd);
// gpio[index]: 整数 uint32 の配列としてレジスタへのアクセスを確立
ptr -> Gpio = (unsigned int *) gpio_map;
return Qnil;
}
// ピン機能の設定(ピンを使用する前に必ず設定)
// mode: GPIO_INPUT, _OUTPUT, _ALT0, _ALT1, _ALT2, _ALT3, _ALT4, _ALT5
VALUE gpio_conf(VALUE self,VALUE i_pin, VALUE i_mode)
{
struct raspgpio *ptr;
// self("struct RData *" である VALUE)から "struct raspgpio *" を取り出す
Data_Get_Struct( self, struct raspgpio, ptr );
int pin = NUM2INT(i_pin);
int mode = NUM2INT(i_mode);
// ピン番号範囲チェック
if (pin < 0 || pin > 31) { return T_FALSE; }
// レジスタ番号(index)と3ビットマスクを生成
int index = pin / 10;
unsigned int mask = ~(0x7 << *1;
// GPFSEL0/1 の該当する FSEL (3bit) のみを書き換え
ptr->Gpio[index] = (ptr->Gpio[index] & mask) | *2;
return T_TRUE;
}
// 指定ピンの出力を1にする
VALUE gpio_set( VALUE self, VALUE i_pin)
{
struct raspgpio *ptr;
// self("struct RData *" である VALUE)から "struct raspgpio *" を取り出す
Data_Get_Struct( self, struct raspgpio, ptr );
int pin = NUM2INT(i_pin);
// ピン番号範囲チェック
if (pin < 0 || pin > 31) { return T_FALSE; }
// ピンに1を出力(3.3V 出力)
ptr->Gpio[7] = 0x1 << pin; // GPSET0
return T_TRUE;
}
// 指定ピンの出力を0にする
VALUE gpio_clear( VALUE self, VALUE i_pin)
{
struct raspgpio *ptr;
// self("struct RData *" である VALUE)から "struct raspgpio *" を取り出す
Data_Get_Struct( self, struct raspgpio, ptr );
int pin = NUM2INT(i_pin);
// ピン番号範囲チェック
if (pin < 0 || pin > 31) { return T_FALSE; }
// ピンに0を出力(0V 出力)
ptr->Gpio[10] = 0x1 << pin; // GPCLR0
return T_TRUE;
}
// ピンへの入力状態を取得する
VALUE gpio_read (VALUE self, VALUE i_pin)
{
VALUE ret;
int st = 0;
struct raspgpio *ptr;
// self("struct RData *" である VALUE)から "struct raspgpio *" を取り出す
Data_Get_Struct( self, struct raspgpio, ptr );
int pin = NUM2INT(i_pin);
// ピン番号範囲チェック
if (pin < 0 || pin > 31) { return T_FALSE; } // FALSE
// ピンへの入力状態を 1/0 で返す
if *3 != 0) {
st = 1;
}
ret = INT2FIX(st);
return ret;
}
2.共有ライブラリの作成
extconf.rb
require "mkmf"
create_makefile "rasp_gpio"
makefile を作成する
ruby extconf.rb
実行すると Makefile が作成されます。
make を実行すると rasp_gpio.so ができ上がります。
3.テスト
GPIO 27ピンを出力に設定 LEDのカソードに接続
出力値 0:LED ON 1:LED OFF
GPIO 22 ピンを入力に設定 スイッチに接続
入力値 スイッチOFF:1 スイッチON:0
動作
GPIO 22 ピンから読み込んだ値を GPIO 27ピンに出力する
実行 sudo ruby test.rb
※rasp_gpio.o は test.rb と同じディレクトリに置く。
test.rb
require './rasp_gpio'
gpio = RaspGpio.new
gpio.conf(27, 0x01) # GPIO 27 OUT
gpio.conf(22, 0x00) # GPIO 22 IN
5.times do |n|
st = gpio.read(22)
puts "GPIO 22pin: %d"%st
(st == 1)? gpio.clear(27): gpio.set(27)
sleep(1)
end
